Are your bicycle hand brakes feeling loose or not stopping your bike as quickly as they should? Knowing how to adjust your hand brakes can make every ride safer and smoother.
Whether you’re new to cycling or just need a quick fix, this guide will show you simple steps you can follow right now. By the end, you’ll have your brakes working perfectly, giving you full control and confidence on the road.
Keep reading—your next ride depends on it!
Credit: www.safetyinfo.com
Tools Needed
Adjusting bicycle hand brakes requires a few simple tools. These tools help make the process smooth and effective. Having the right tools saves time and effort. It also ensures your brakes work safely and well.
Allen Wrenches
Allen wrenches are essential for most bike brake adjustments. They fit the bolts on brake levers and calipers. Typically, sizes 4mm and 5mm are common for bike brakes. Keep a set handy for different bolt sizes.
Screwdrivers
A flathead or Phillips screwdriver is useful for fine-tuning brake pads. Some brake pads have screws that need tightening or loosening. Choose the screwdriver type that matches your brake hardware.
Adjustable Wrench
An adjustable wrench helps with nuts on brake cables. It tightens or loosens cable anchors. This tool fits various nut sizes, making it versatile for bike repairs.
Bike Cable Cutters
Cable cutters are designed to cut brake cables cleanly. They prevent frayed ends that can cause problems. Use them if you need to replace or shorten brake cables.
Rag Or Cloth
A clean rag helps wipe dirt from brake parts. It keeps the area clean for better adjustments. Clean brakes perform more reliably and last longer.
Check Brake Pad Alignment
Start by checking if the brake pads line up with the rim. Misaligned pads can cause poor braking and wear. Adjust the pads so they touch the rim evenly when the brake is pulled.
Why Check Brake Pad Alignment?
Proper brake pad alignment is key for safe stopping. Pads that do not touch the rim evenly cause poor braking. Misaligned pads wear out faster and can damage your wheel.
Checking alignment helps your brakes work smoothly. It keeps your ride safe and comfortable. This step takes only a few minutes but makes a big difference.
How To Inspect Brake Pad Position
Look closely at the brake pads while squeezing the brake lever. Pads should hit the rim flat and not touch the tire. Make sure the entire pad contacts the rim surface.
If the pad touches the tire or misses part of the rim, it needs adjustment. Check both sides to ensure equal pressure. Uneven pads reduce brake power and cause noise.
Adjusting The Brake Pad Alignment
Loosen the bolt holding the brake pad using an Allen key or wrench. Move the pad up, down, or sideways to align it perfectly with the rim. The pad should sit parallel to the rim’s edge.
Tighten the bolt and test the brake lever again. Repeat adjustment if the pad still does not hit the rim correctly. Proper alignment stops the wheel safely and avoids rubbing.
Inspect Brake Cable Tension
Inspecting the brake cable tension is important for safe bike rides. Proper tension ensures the brakes respond quickly and stop the bike effectively. Loose cables can cause weak braking, while too tight cables may cause the brakes to drag.
Check the cable tension regularly. It helps keep your bike’s hand brakes in good shape. Understanding how to inspect and adjust the tension improves your bike control and safety.
Check Brake Lever Feel
Start by squeezing the brake lever slowly. Notice how it feels. The lever should move smoothly and stop before hitting the handlebar. If it feels loose or too tight, the cable tension needs adjustment.
Inspect Cable For Slack
Look along the brake cable for any slack or looseness. The cable should be taut but not overly tight. Press the brake pads against the rim. The cable should pull firmly without extra play.
Adjust Cable Tension
Use the barrel adjuster near the brake lever or caliper. Turn it to tighten or loosen the cable. Small turns make big changes. Tighten if the brakes feel loose. Loosen if the brakes drag on the rim.
Test Brake Response
After adjusting, squeeze the brake lever again. The brake pads should touch the rim quickly and firmly. The lever should not hit the handlebar. Make minor adjustments until the brakes feel right.
Adjusting The Brake Cable
Adjusting the brake cable is key to making your bicycle brakes work well. A tight cable means better stopping power. A loose cable can make brakes feel soft or slow to respond.
This process is simple and does not need special tools. You can do it at home with just a few steps.
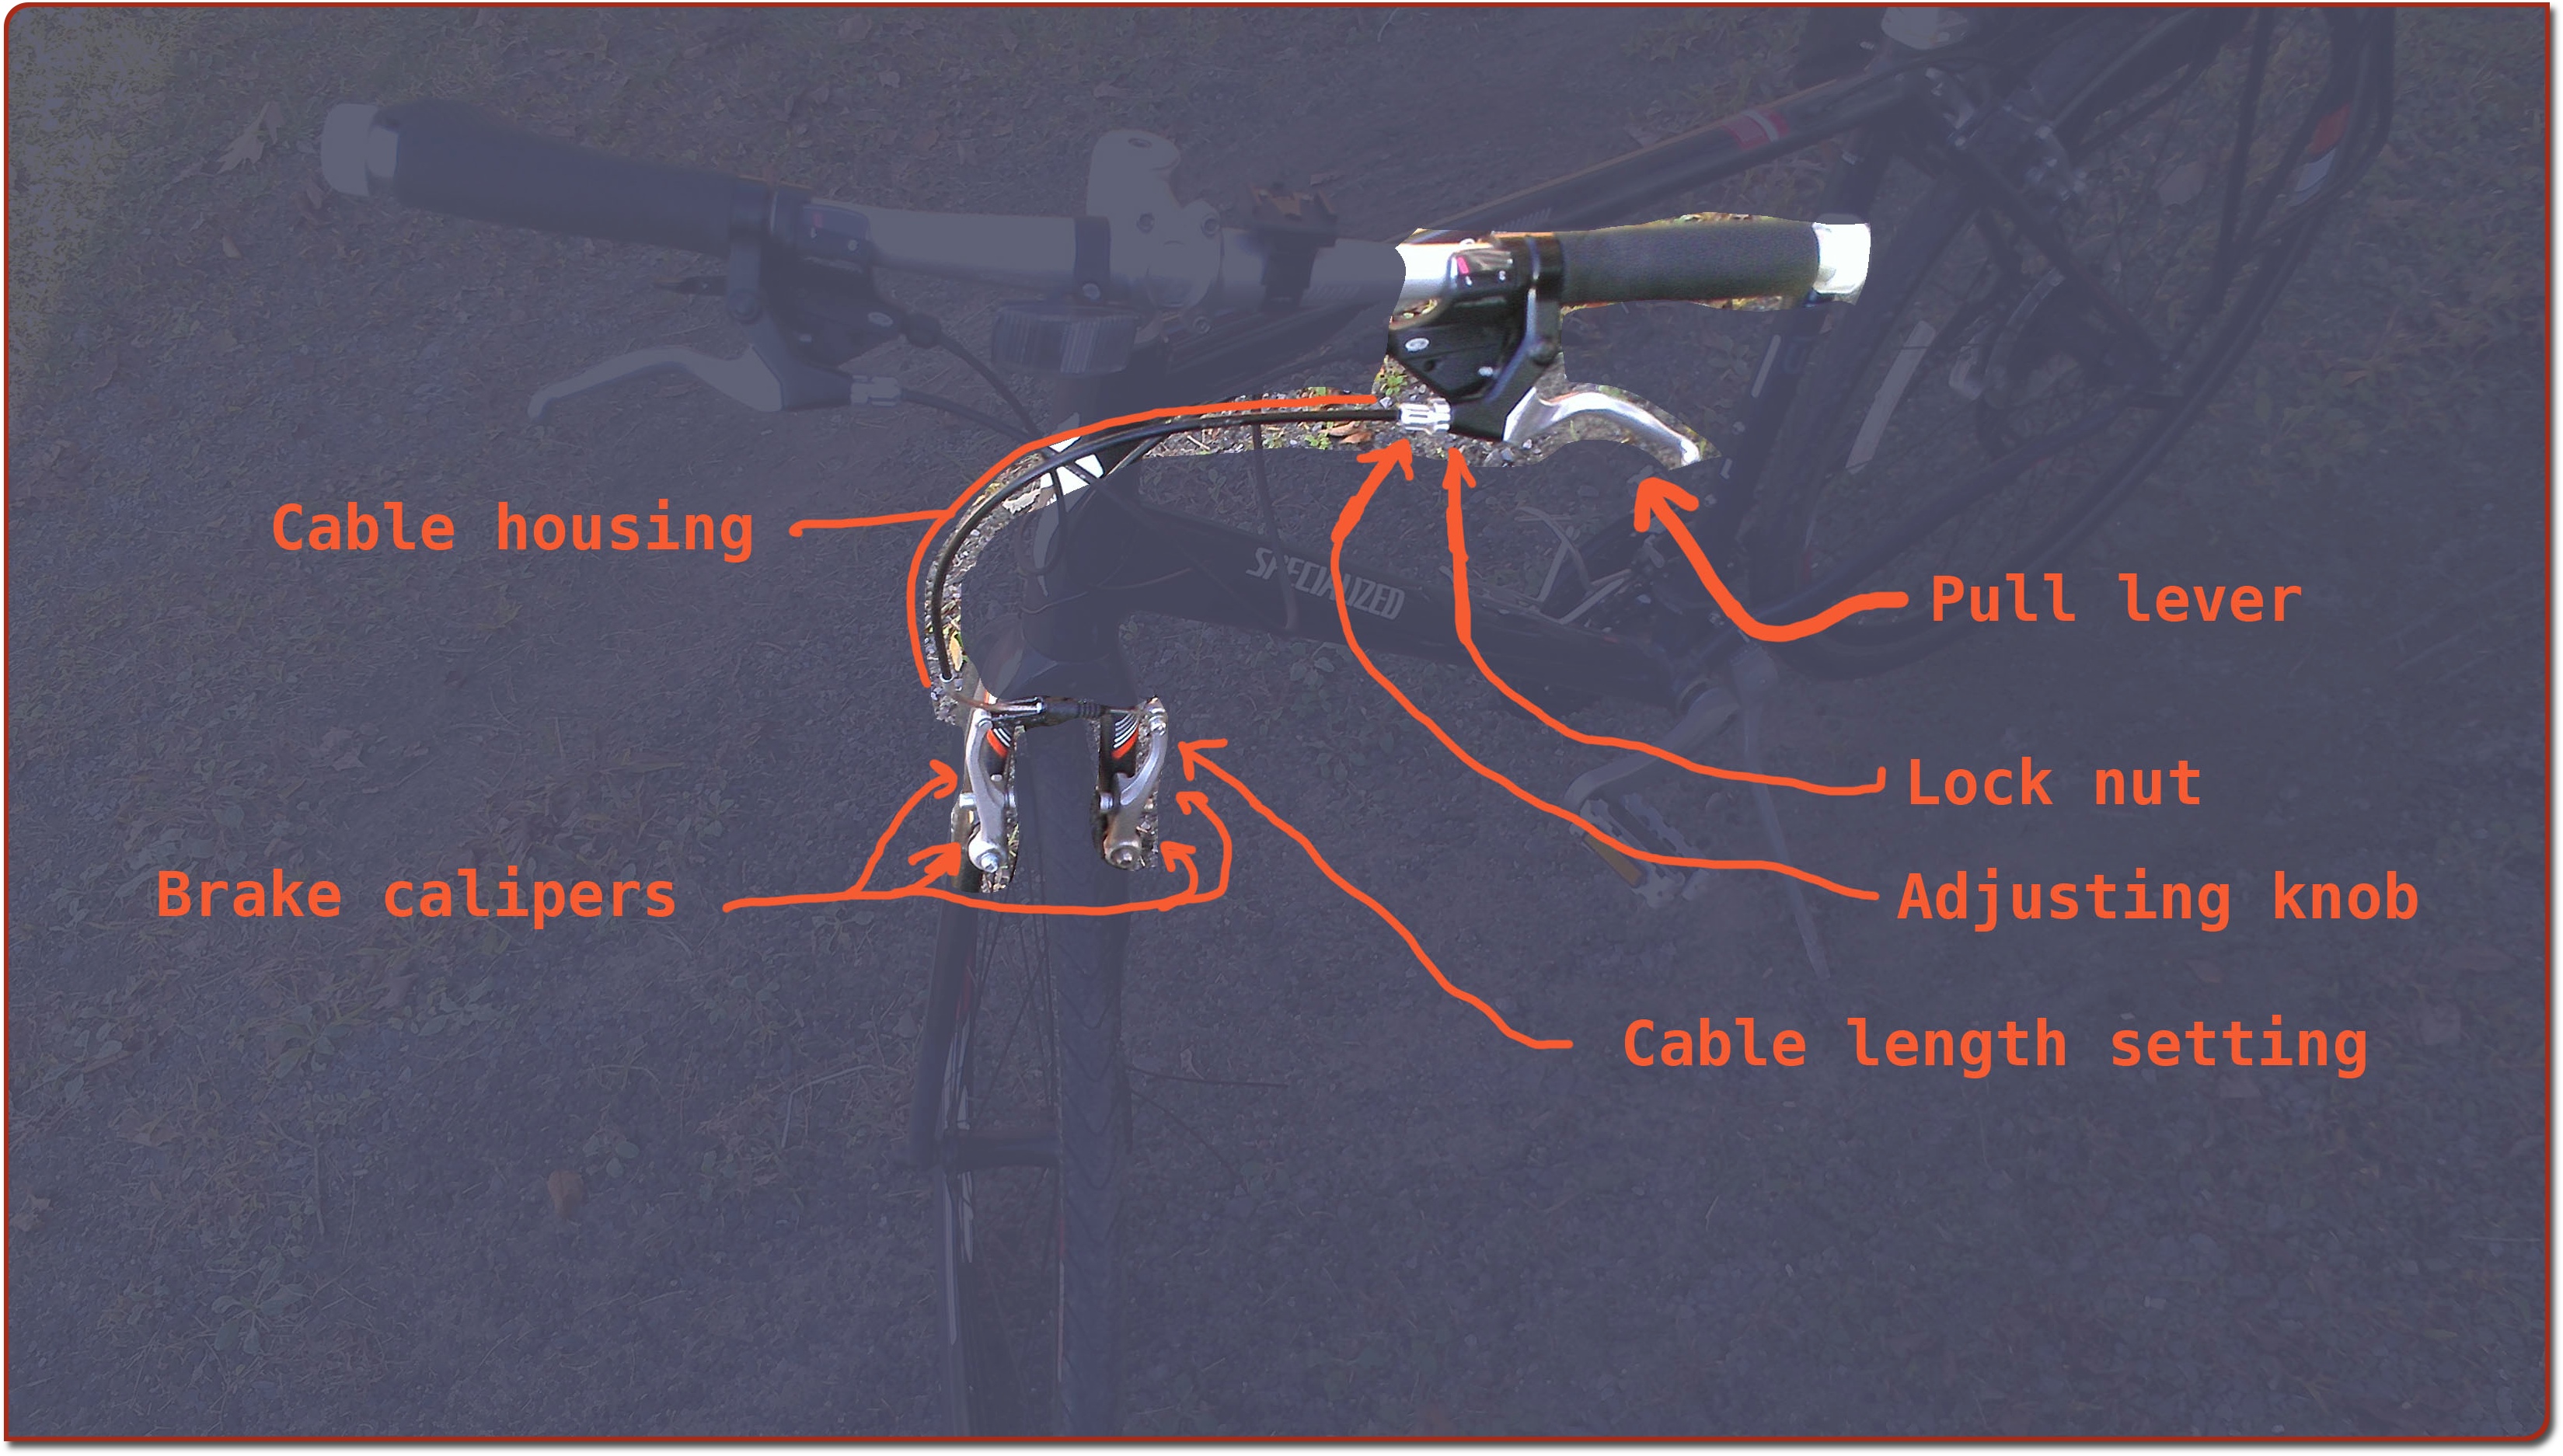
Locate The Barrel Adjuster
The barrel adjuster is near the brake lever or the brake caliper. It looks like a small cylinder. Turning it changes the cable tension. Turn it counterclockwise to tighten the cable. Turn it clockwise to loosen it.
Loosen The Cable Fixing Bolt
Find the bolt that holds the brake cable on the brake arm. Use a wrench or an Allen key to loosen it. Do not remove it completely. Just loosen enough to move the cable freely.
Pull The Cable Tight
Pull the brake cable by hand to remove slack. Hold the cable firmly. Make sure the brake pads are close to the wheel rim but not touching it. Tightening the cable improves brake response.
Tighten The Cable Fixing Bolt
While holding the cable tight, tighten the fixing bolt. Make sure the cable does not slip. Check the brake pads again. They should move when you pull the brake lever.
Test The Brake Lever
Pull the brake lever several times. Check if the brakes feel firm and stop the wheel quickly. Adjust the barrel adjuster if the cable feels too tight or loose. Small changes can improve brake feel a lot.
Fine-tuning Brake Pads
Fine-tuning your bicycle’s brake pads helps you stop safely and smoothly. Proper adjustment makes the brakes more effective. It also prevents uneven wear on the pads and rims. Small changes can improve your ride’s control and comfort.
Look closely at the brake pads and rims. The pads should touch the rim squarely. Avoid contact with the tire or spokes. Misaligned pads wear unevenly and reduce braking power. Adjust the angle by loosening the pad bolt slightly. Move the pad until it sits flat on the rim. Then tighten the bolt firmly.
Adjust Pad Height
The brake pad should cover the rim surface fully. It should not hang below the rim or miss the rim edge. Pads too low can rub the tire. Pads too high can miss the rim. Loosen the pad bolt and slide the pad up or down. Test the brake lever to check the pad position. Make sure the pads hit the rim early when you squeeze the brake.
Set Proper Pad Distance
The gap between the brake pad and rim matters. Too close, the pads may rub when you ride. Too far, the brakes feel weak or slow. Turn the barrel adjuster or loosen the cable bolt to set the gap. Aim for 1 to 2 millimeters on each side. Spin the wheel to check for rubbing. Adjust until the wheel turns freely but brakes respond quickly.

Credit: www.youtube.com
Testing Brake Performance
Check brake performance by squeezing the hand lever and feeling resistance. Adjust the brake cable tightness until the brakes stop the wheel quickly and smoothly. Test multiple times for safety and proper function.
Why Test Brake Performance?
Testing your bike’s hand brakes is crucial for safe riding. Good brakes stop the bike quickly and smoothly. Poor brakes can cause accidents or damage.
After adjusting the brakes, always check how well they work. This step helps you find any problems early. It ensures your brakes respond just right.
How To Perform A Basic Brake Test
First, find a flat, open space to test your brakes. Ride slowly and gently squeeze the brake levers. Notice how the bike slows down.
If the brakes feel weak or take too long to stop, adjust them again. A good brake should stop the bike without much force.
Checking For Brake Noise And Smoothness
Listen for any squeaking or rubbing sounds when braking. Noise often means the brake pads are not aligned well. Pads should touch the rim evenly and smoothly.
Spin the wheel and watch if the brake pads rub the rim without braking. If they do, the brakes need fine tuning for better performance.
Common Brake Issues
Bicycle hand brakes need regular checks for safe riding. Some common problems reduce brake power. Knowing these issues helps you fix brakes fast. Keep your bike safe by spotting brake troubles early.
Brake Pads Worn Out
Brake pads wear down with use. Thin pads cause poor stopping power. Check pads for cracks or smooth surfaces. Replace pads if they look very thin. New pads improve brake grip and safety.
Loose Brake Cables
Brake cables can stretch over time. Loose cables make brakes feel soft. Squeeze brake levers and watch for slack. Tighten cables to restore firm brake feel. Proper cable tension helps quick stops.
Misaligned Brake Pads
Brake pads must touch the rim evenly. Pads too high or low cause noise and poor braking. Check that pads hit the rim squarely. Adjust pad position for full contact. Correct alignment stops the bike safely.
Dirty Or Rusty Brake Parts
Dirt and rust reduce brake performance. Clean rims and brake parts regularly. Use a cloth and mild cleaner for best results. Rusty cables or springs may need replacement. Clean parts ensure smooth brake action.
Credit: www.cycleplan.co.uk
Preventive Maintenance Tips
Preventive maintenance keeps bicycle hand brakes working well and safe. Regular care helps avoid sudden brake failure and costly repairs. Simple checks and small adjustments can extend brake life and improve riding comfort.
Routine attention to brake parts ensures smooth stopping power. It also prevents wear and tear that can weaken brake performance. Spending a few minutes on maintenance can save time and trouble later.
Check Brake Pads Regularly
Look at the brake pads for wear or damage. Replace pads if they are too thin or cracked. Worn pads reduce braking power and can damage the rim.
Clean Brake Components
Dirt and grime on brakes affect stopping ability. Use a soft cloth and mild cleaner to wipe pads, rims, and levers. Clean parts work better and last longer.
Inspect Brake Cables
Brake cables must move smoothly inside their housing. Check cables for fraying or rust. Replace damaged cables to keep brakes responsive and safe.
Adjust Brake Lever Reach
Set the lever reach to fit your hand size. Levers too far or close can cause poor control. Adjust the reach screw to a comfortable position.
Tighten Loose Bolts And Screws
Loose bolts on brake arms or levers reduce brake efficiency. Use the right tools to tighten them securely. Properly tightened parts maintain brake alignment and function.
Frequently Asked Questions
How Do I Know If My Hand Brakes Need Adjustment?
If your brakes feel loose or require excessive lever pull, they likely need adjustment. Check if the brake pads contact the rim evenly and stop the wheel promptly. Squealing or poor stopping power also indicates the need for brake adjustment.
What Tools Are Required To Adjust Bicycle Hand Brakes?
You typically need an Allen wrench or hex key, a screwdriver, and sometimes pliers. These tools help tighten cable tension, adjust brake pad position, and secure bolts. Having these ready simplifies the brake adjustment process.
How Can I Tighten Loose Bicycle Hand Brakes?
To tighten loose brakes, turn the barrel adjuster on the brake lever or caliper clockwise. If more adjustment is needed, loosen the cable anchor bolt, pull the brake cable tighter, then retighten the bolt. Test brake responsiveness after adjustment.
How Often Should I Adjust My Bicycle Hand Brakes?
Adjust your hand brakes whenever you notice reduced braking efficiency or excessive lever travel. Regular checks every few months help maintain safety. Frequent adjustments are common if you ride often or in varied conditions.
Conclusion
Adjusting bicycle hand brakes keeps you safe and in control. Tight brakes stop your bike quickly and smoothly. Loose brakes can cause accidents or make riding hard. Check your brakes often and fix them when needed. Small steps, like turning the barrel adjuster or tightening bolts, make a big difference.
Practice these steps to feel confident on your bike. Safe rides start with good brake care. Keep your brakes ready for every ride.