Are your bicycle’s hydraulic disc brakes not working as smoothly as they should? If you’ve noticed spongy brakes, strange noises, or less stopping power, it’s time to make an adjustment.
Knowing how to adjust your hydraulic disc brakes can save you money, improve your ride, and keep you safer on the road or trail. You’ll discover simple, step-by-step tips to fine-tune your brakes quickly and confidently—even if you’re not a bike mechanic.
Keep reading, and get ready to take full control of your ride’s stopping power!
Tools Needed
Adjusting hydraulic disc brakes on a bicycle requires the right tools. Using proper equipment makes the job easier and safer. Some tools are essential, while others can help but are not necessary.
Essential Equipment
First, you need an Allen wrench set. Most hydraulic brakes use Allen bolts. Sizes like 4mm, 5mm, and 6mm are common.
A clean rag or paper towels help wipe off brake fluid and dirt. Brake fluid can damage paint, so clean spills quickly.
A small flat-head screwdriver is useful for fine adjustments on some brake models.
Hydraulic brake fluid is necessary if you need to top up or bleed the brakes. Check your brake brand for the correct type.
Optional Accessories
A bleed kit makes bleeding the brakes easier and cleaner. It usually includes syringes, hoses, and adapters.
Brake pad spacers help keep the pistons apart during maintenance. This prevents pads from sticking together.
A torque wrench ensures bolts are tightened to the correct level. Over-tightening can damage parts, while under-tightening may cause problems.
Isopropyl alcohol is great for cleaning rotors and brake pads without leaving residue.
Credit: workholidayjiang.medium.com
Brake System Basics
Understanding the basics of your bicycle’s brake system helps with proper adjustments. Hydraulic disc brakes use fluid to transfer force. This system offers strong and consistent stopping power. Knowing the parts and how they work makes adjusting easier.
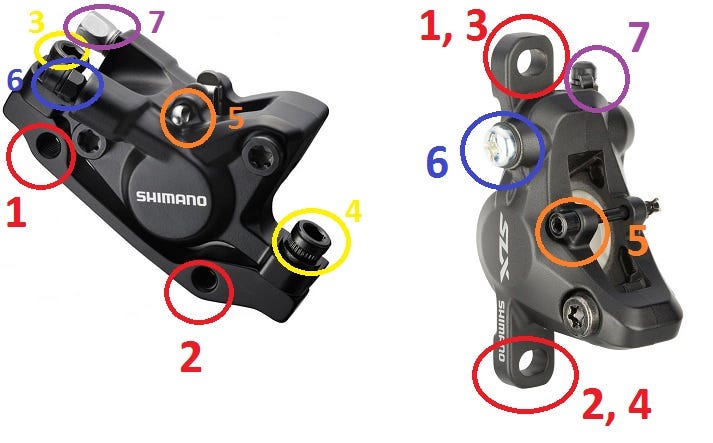
Hydraulic Brake Components
The main parts include the brake lever, hose, caliper, and rotor. The lever is where you apply pressure. The hose carries brake fluid to the caliper. The caliper holds pistons that push brake pads. The rotor is the disc attached to the wheel.
How Hydraulic Brakes Work
Pressing the brake lever pushes fluid through the hose. The fluid moves the pistons in the caliper. Pistons press the brake pads against the rotor. This creates friction that slows the wheel down. Fluid pressure gives smooth and powerful braking.
Signs Of Misalignment
Hydraulic disc brakes need proper alignment to work well. Misalignment causes problems that affect safety and comfort. Recognizing the signs helps you fix the brakes early. Watch for noises, drag, or a soft brake lever. These signs show your brakes need adjustment. Acting quickly keeps your bike safe and smooth.
Noise And Squealing
Noise is the first sign of misaligned brakes. Squealing or rubbing sounds mean the rotor and pads do not line up. Dirt or oil can cause noise, but most times it is alignment. The pads may hit the rotor unevenly. This wears out the pads fast and lowers brake power.
Brake Drag
Brake drag happens when the rotor stays close to the pads. The wheel slows down even if you do not press the lever. This makes riding harder and wastes energy. Drag means the brake caliper is not centered or the pads are too tight. Dragging brakes also cause extra wear on parts.
Spongy Lever Feel
A soft or spongy brake lever means poor brake response. The lever may feel loose or go too far before stopping. Air in the brake line or wrong pad distance can cause this. Spongy brakes need quick attention to avoid accidents. Check the brake fluid and pad position for proper feel.

Credit: www.youtube.com
Preparation Steps
Before adjusting hydraulic disc brakes, take time to prepare. Proper preparation helps you fix the brakes safely and effectively. It also protects your bike parts from damage.
Start by clearing dirt and dust around the brake area. Then, check the brake pads and rotors closely. These steps ensure your brakes work well after adjustment.
Cleaning The Brake Area
Use a clean cloth to wipe the brake area gently. Remove dust, mud, and grease from the caliper and rotor. Avoid using oily or greasy cleaners that can harm brake parts. Clean parts help the brakes respond better and last longer.
Inspecting Brake Pads And Rotors
Look at the brake pads for wear or damage. Pads should have enough material left to stop the bike safely. Check the rotors for scratches, warping, or rust. Damaged pads or rotors reduce braking power and need replacement before adjustment.
Aligning The Caliper
Aligning the caliper is a key step in adjusting bicycle hydraulic disc brakes. It ensures the brake pads contact the rotor evenly. Proper alignment prevents noise and improves braking power. This process is simple and requires only a few tools.
Loosening Caliper Bolts
Start by loosening the bolts that hold the caliper to the frame. Use the correct size Allen wrench. Do not remove the bolts completely. Just loosen them enough to allow the caliper to move side to side.
Centering The Caliper Over Rotor
Next, squeeze the brake lever gently. This centers the caliper over the rotor. Keep holding the lever while you adjust the caliper. Move the caliper left or right until it is perfectly centered. This step helps avoid rubbing and uneven pad wear.
Tightening Bolts Correctly
While holding the caliper in place, tighten the bolts firmly. Use a torque wrench if possible to avoid over-tightening. Tighten bolts evenly and check the caliper stays centered. Test the brake lever to ensure smooth and strong braking.
Adjusting Brake Lever Feel
Adjusting the brake lever feel is key to safe and smooth riding. The lever should feel firm and responsive, not soft or spongy. A proper feel helps you control the brakes better and stop quickly when needed.
Two main things affect lever feel: the fluid level in the brake system and the presence of air bubbles. Both can cause poor braking performance. Fixing these issues involves checking fluid levels and bleeding the brakes.
Checking Fluid Levels
Start by inspecting the brake fluid reservoir on the brake lever. Open the reservoir cover carefully. The fluid should be near the top, but not overfilled. Low fluid can cause soft lever feel and weak brakes.
If the fluid is low, add the correct brake fluid type. Use only the fluid recommended by your brake manufacturer. Too much fluid can cause leaks or damage. Always clean any spilled fluid immediately. Wipe the reservoir and close it tightly after refilling.
Bleeding The Brake System
Air bubbles trapped inside the brake lines cause a spongy lever feel. Bleeding removes these bubbles and old fluid. Use a brake bleed kit made for your brake model.
Attach the bleed kit to the brake caliper and lever. Pump the brake lever slowly to push air and old fluid out. Keep adding fresh brake fluid during the process. Continue until no air bubbles appear and the lever feels firm.
Bleeding takes time and care. Do it in a clean, well-lit area. Follow the brake brand instructions closely. Proper bleeding improves brake power and lever feel immediately.
Replacing Brake Pads
Replacing brake pads is an important step to keep your bicycle’s hydraulic disc brakes working well. Worn-out pads reduce stopping power and can damage the rotor. Changing the pads is simple with the right tools and careful steps. This guide explains how to remove old pads, install new ones, and properly bed them in for best performance.
Removing Old Pads
Start by removing the wheel to access the brake caliper easily. Use a small tool to push the pistons back into the caliper. This makes room for the new pads. Next, remove the retaining pin or clip holding the pads. Pull the old pads out carefully. Check the caliper and rotor for dirt and clean if needed.
Installing New Pads
Insert the new brake pads into the caliper in the correct position. Make sure they fit snugly and align with the rotor. Replace the retaining pin or clip to hold the pads in place. Press the pistons slightly to secure the pads against the rotor. Reinstall the wheel and tighten the axle properly.
Bed-in Procedure
Bed-in the new pads to improve braking power and pad life. Ride your bike to a safe area and gently apply the brakes several times. Gradually increase the brake force but avoid hard stops. This helps the pads match the rotor surface evenly. After bed-in, check for noise or vibration and adjust if needed.
Troubleshooting Tips
Troubleshooting hydraulic disc brakes can feel tricky at times. Small issues may stop your brakes from working well. This section helps you fix common problems quickly. Clear explanations make the process simple and fast.
Fixing Persistent Noise
Noisy brakes often mean dirt or worn parts. Clean the rotor and pads with rubbing alcohol. Check for oil or grease on the braking surface. Replace pads if they look shiny or cracked. Tighten any loose bolts on the caliper and rotor. Sometimes, sanding the pads lightly can stop noise. Make sure the rotor is not bent or damaged.
Addressing Brake Fade
Brake fade happens when brakes lose power after heavy use. This is usually from overheating. Let brakes cool down before riding again. Avoid long, hard braking on steep hills. Check the brake fluid level and top it up if low. Bleed the brakes to remove air bubbles. Use pads made for high heat if you ride hard often.
Handling Lever Sponginess
Spongy brake levers feel soft and weak. This is caused by air in the brake lines. Bleed the brakes to remove trapped air. Make sure to use the correct brake fluid type. Check for leaks in hoses and fittings. Tighten or replace any damaged parts. Proper bleeding restores firm and quick lever action.

Credit: www.wikihow.com
Frequently Asked Questions
How Do I Know If My Hydraulic Disc Brakes Need Adjustment?
If your brakes feel spongy or less responsive, they likely need adjustment. Also, check for brake drag or uneven pad wear. These signs indicate your hydraulic disc brakes require fine-tuning for optimal performance and safety.
What Tools Are Required To Adjust Hydraulic Disc Brakes?
You need a hex wrench, a Torx wrench, and a brake bleed kit for adjustments. Additionally, a clean cloth and isopropyl alcohol help clean the rotor and pads. These tools ensure precise and safe brake adjustments.
Can I Adjust Hydraulic Disc Brakes Without Bleeding?
Yes, minor adjustments like pad alignment or lever reach can be done without bleeding. However, if the brakes feel soft or unresponsive, bleeding the system is necessary to remove air bubbles. Proper maintenance keeps braking smooth and reliable.
How Often Should I Adjust My Hydraulic Disc Brakes?
Adjust your brakes whenever you notice reduced braking power, noise, or lever travel changes. Regular inspection after every few rides helps maintain brake performance and extends the lifespan of brake components.
Conclusion
Adjusting your bicycle hydraulic disc brakes improves safety and ride quality. Regular checks keep brakes responsive and smooth. Small tweaks make a big difference in stopping power. Follow the steps carefully and take your time. Practice helps you understand your bike better.
Good brake adjustment means more control on every ride. Stay safe and enjoy cycling with well-tuned brakes.