Are your bicycle brakes feeling too tight or rubbing against the wheel? This can make your ride uncomfortable and slow you down.
You might be wondering how to fix this quickly and safely. Knowing how to loosen your bike brakes can save you time, improve your ride, and even prevent damage to your bike. In this guide, you’ll discover simple, step-by-step tips that anyone can follow to get your brakes working smoothly again.
Keep reading, and soon you’ll enjoy a smoother, safer ride every time you hop on your bike.
Signs Of Tight Brakes
Tight brakes on a bicycle can cause several problems. They make riding harder and less safe. Recognizing the signs early helps fix the brakes before they cause trouble. Knowing what to look for saves time and effort.
Common Brake Issues
Brakes that feel stiff or hard to press often mean they are too tight. The brake pads may rub against the wheel even without pressing the lever. This constant rubbing wears out the pads and tires fast. You might hear a squeaking or scraping sound during riding. The brake cables can also be too short or stretched, causing tightness. Sometimes, the brake lever does not return smoothly to its starting position.
Effects On Riding
Tight brakes slow you down even on flat roads. They make pedaling harder and less smooth. Riding becomes tiring and uncomfortable over time. Tight brakes can reduce your control, especially on turns or downhill. This increases the risk of accidents. The extra friction wastes your energy and can cause damage to the bike parts. Your bike may feel less responsive and heavier to ride.
Credit: bicyclenetwork.com.au
Tools Needed
To loosen the brakes on a bicycle, having the right tools is important. The right tools make the job easier and safer. You do not need many tools to start. Some tools are basic and often found at home. Others are optional but helpful for a smoother process.
Basic Tools List
- Allen wrench set – usually 4mm or 5mm sizes
- Adjustable wrench or spanner
- Flathead screwdriver
- Needle-nose pliers
- Bike stand or a way to lift the bike
These tools help you adjust brake cables, bolts, and pads. Allen wrenches fit most brake bolts. Pliers help with cable tension. A bike stand keeps your bike steady.
Optional Tools
- Torque wrench for precise tightening
- Cable cutters for clean cable ends
- Lubricant to ease moving parts
- Rag for cleaning dirt and grease
These tools are not required but improve the job. Clean cuts and proper torque protect your brakes. Lubricant keeps parts moving smoothly. A rag helps keep everything neat.
Adjusting Cable Tension
Adjusting cable tension is key to loosening bicycle brakes. Proper tension helps brakes work smoothly. Too tight cables cause brakes to drag. Too loose cables reduce stopping power.
Adjusting cable tension is simple. It needs only a few tools and steps. This section explains how to find and adjust the brake cable. Follow these steps carefully.
Locating The Brake Cable
First, find the brake cable on your bike. It runs from the brake lever to the brake arms. The cable is thin and metal, covered with a plastic sheath. Trace it along the frame. Look near the wheel for where it connects to the brakes.
Loosening Cable Bolts
Next, find the bolt holding the brake cable on the brake arms. Use an Allen wrench or screwdriver. Turn the bolt counterclockwise to loosen it. Do not remove it completely. Loosening the bolt frees the cable for adjustment.
Releasing Cable Tension
Now, pull the brake cable gently to release tension. Pull just enough to create slack. This slack loosens the brakes. Hold the cable in place. Tighten the bolt again. Test the brake lever for proper movement.
Aligning Brake Pads
Aligning brake pads is a key step in loosening bicycle brakes. Proper alignment helps brakes work smoothly and safely. Misaligned pads can cause rubbing or poor stopping power. This section explains how to check and adjust brake pads correctly. Follow these steps to ensure your brakes work well without being too tight.
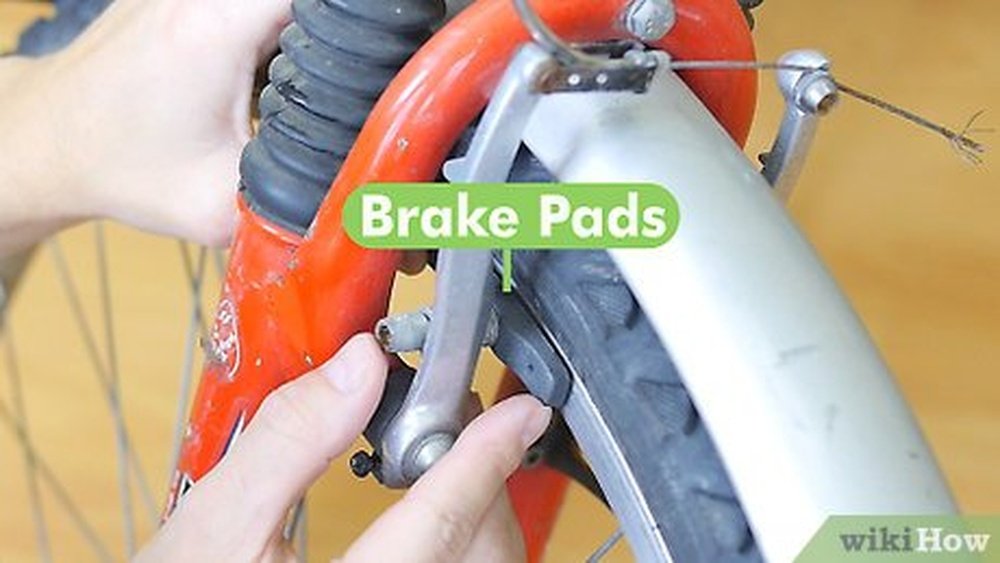
Checking Pad Position
First, look at the brake pads on each side of the wheel. They should face the rim squarely. Pads must touch the rim evenly, not the tire or spokes. Check if pads sit flat against the rim surface. Misplaced pads can cause uneven wear and noise.
Adjusting Pad Distance
Next, check the gap between the pads and the rim. The pads should be close but not touching the rim when brakes are released. Use a small gap, about 1-2 millimeters, for smooth braking. Loosen the pad bolts to move them closer or farther from the rim. Tighten bolts once the position feels right.
Ensuring Even Contact
Brake pads must touch the rim evenly on both sides. Squeeze the brake lever gently and watch the pads. Both sides should hit the rim at the same time. Uneven contact causes one pad to wear faster and reduces brake power. Adjust pad position until contact is even and balanced.
Adjusting Brake Levers
Adjusting the brake levers is key to loosening bicycle brakes. Proper lever settings improve comfort and control. A small change can reduce brake tightness and help smooth braking. Follow clear steps to adjust your brake levers correctly.
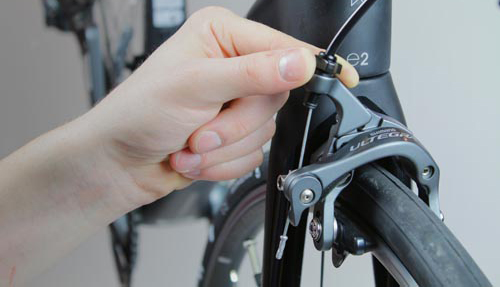
Lever Reach Settings
Lever reach means the distance between the handlebar and the brake lever. Adjusting this helps you hold the lever comfortably. Find the small screw or dial near the lever pivot. Turn it to move the lever closer or farther. A good reach lets your fingers pull the lever without strain. Check both sides for equal distance. Test by squeezing the levers gently. Adjust until you feel a natural grip and easy brake release.
Cable Tension From Levers
Cable tension controls how tight your brakes feel. Too much tension causes tight brakes. Too little makes brakes loose or slow to respond. Start by loosening the cable adjuster on the lever. Pull the cable slightly to add slack and reduce tightness. Tighten the adjuster to lock the cable in place. Squeeze the brake lever to check tension. Adjust again if brakes feel too tight or too loose. Proper cable tension lets the brake pads move smoothly.
Testing Brake Performance
Testing brake performance is a vital step after loosening your bicycle brakes. It ensures your brakes work properly and keep you safe on the road. Checking brake function helps find any issues early. It also boosts your confidence while riding.
Safety Check
Start with a safety check before testing brakes. Inspect brake pads for wear or damage. Make sure cables are tight and not frayed. Check that brake levers move smoothly. Confirm the wheels spin freely without brake drag. This quick check prevents accidents and brake failure.
Test Ride Tips
Choose a quiet, flat area for your test ride. Ride slowly and apply brakes gently at first. Feel how the brakes respond and stop the bike. Try braking from different speeds to check consistency. Listen for strange sounds or squeaks. Stop immediately if brakes feel weak or sticky.
Maintenance Tips
Proper maintenance keeps your bicycle brakes working well and safe. Regular care prevents tight brakes and other issues. Follow simple steps to keep brakes loose and smooth. Check your brakes often and fix small problems fast. This saves time and money on repairs.
Regular Inspection
Look at brake pads for wear or damage. Check cables for rust or fraying. Test brake levers to see if they move freely. Make sure brake arms return to their position easily. Tight parts or dirt cause brakes to stick. Inspect your brakes before every ride for safety.
Lubrication Points
Apply light oil to brake pivot points and springs. Avoid oil on brake pads or rims. Use a clean cloth to wipe excess lubricant. Lubrication reduces friction and helps brakes move smoothly. Do this every few weeks or after wet rides. Proper lubrication prevents brakes from sticking or feeling tight.

Credit: www.wikihow.com

Credit: www.youtube.com
Frequently Asked Questions
How Do I Know If My Bicycle Brakes Are Too Tight?
If braking feels stiff or the wheel stops abruptly, your brakes may be too tight. Check if the brake pads touch the rim without squeezing the lever. Tight brakes can cause premature wear and reduce safety.
What Tools Are Needed To Loosen Bicycle Brakes?
You mainly need a 5mm Allen wrench or a screwdriver, depending on your brake type. Some bikes may require pliers or a cable cutter. These tools help adjust the brake cable tension and loosen the brakes safely.
Can I Loosen Brakes Without Removing The Wheel?
Yes, you can loosen brakes without removing the wheel. Loosen the brake cable tension by adjusting the barrel adjuster or cable clamp. This method is quicker and ideal for minor brake adjustments.
How Much Should I Loosen Bicycle Brakes?
Loosen brakes just enough so pads clear the rim by 1-2 mm when not applied. Ensure the brake lever still provides good stopping power. Over-loosening can reduce braking efficiency and compromise safety.
Conclusion
Loosening your bicycle brakes helps improve your ride comfort and safety. Check the brake cables and pads regularly for tightness. Use simple tools to adjust the brake tension carefully. Small changes can make a big difference in brake feel. Always test your brakes after adjusting to ensure they work well.
Keeping brakes properly loose prevents rubbing and wear. Riding with smooth brakes feels better and saves energy. Practice these steps to keep your bike in good shape. Regular care makes biking more fun and safe for everyone.